 how-to
Installing Putting Greens in Shady Backyards: 2026 Guide
Table of Contents
- Why Shade Changes Everything for Putting Green Installation
- Site Selection and Shade Assessment Before You Dig
- Artificial Turf Drainage for Shade: Sub-Base, Compaction, and Percolation
- Choosing Turf Pile Height and Backing for Shaded Greens
- Step-by-Step Installation Process for a Shaded Backyard Putting Green
- Backyard Putting Green Maintenance in Shade: Mold, Mildew, and Airflow
- Cost of Professional Putting Green Installation: What Affects Your Quote
- Common Mistakes to Avoid in Shady Backyard Installations
- Frequently Asked Questions
Last Updated: September 30, 2026
Why Shade Changes Everything for Putting Green Installation
Shade breaks the rules that make most putting green builds simple. Installing putting greens in shady backyards forces you to solve two problems at once: water that will not evaporate, and turf that will not dry. Get those wrong and your green turns into a soggy, moldy mess within one season.
The Moisture Problem Under Tree Canopy
Tree canopy blocks sun and traps moisture. A shaded yard can stay damp for days after rain while a sunny yard dries by lunchtime. That trapped water sits in your base, feeding mold, weakening the sub-base, and softening the surface until putts break in ways you never designed.
How Shade Affects Turf Density and Ball Roll
Less sun means thinner turf fibers and slower recovery, so density drops and a thin green plays slow and grabby, a stimpmeter reading can fall several feet short of the same turf in full sun. The goal is not shade tolerance but a build that drains fast and holds its density anyway.
Site Selection and Shade Assessment Before You Dig
Site selection starts with a simple test: watch your yard for a full day and map where sun actually lands. Most homeowners guess wrong. Check these before you commit:
- Sun hours: A putting green needs at least 4 to 6 hours of direct sun for healthy turf.
- Tree species: Pines drop acid needles. Oaks drop leaves and acorns. Both matter.
- Root zones: Large roots make excavation a nightmare.
- Water flow: Find the low spots where rain pools.
- Air movement: A yard boxed in by fences and hedges holds moisture.
Artificial Turf Drainage for Shade: Sub-Base, Compaction, and Percolation
Artificial turf drainage for shade is the single most important part of the build. A shaded green needs a sub-base that moves water away fast, because the sun will never do that job for you.
Building a Sub-Base That Moves Water
The sub-base is the foundation. Skip it and nothing above it will last.
A proper shaded build uses:
- Excavation to 3 to 4 inches of depth
- Compaction in lifts, not all at once
- Crushed stone graded for drainage
- Base stabilization to stop shifting over time
Geotextile Fabric and Crushed Stone Layers
Geotextile fabric sits between the soil and the stone, stopping fine soil from migrating up and clogging the drainage stone. Above it, crushed stone goes in graded lifts, coarser at the bottom, finer on top. The finer top layer gives a true, level roll; the coarser base handles the water.
Choosing Turf Pile Height and Backing for Shaded Greens
Turf pile height and backing decide how your green performs in low light. In a shaded yard, the turf itself becomes part of the drainage system, and two specs control how well it does that job, pile height and face weight.
Why Pile Height Controls Moisture Retention in Shade
Pile height is the length of the individual turf fibers measured from the backing to the tip, not the same as total turf thickness or face weight. Water travels down the fiber, through the backing, into the infill, and out through the sub-base. Every extra fraction of an inch of pile adds surface area that holds a film of water and blocks airflow across the backing.
Face Weight and Density: The Specs That Actually Matter in Low Light
Face weight is the mass of fiber per square yard of turf, usually in ounces; density is how tightly those fibers are tufted into the backing. In shade they matter more than pile height alone.
- Higher face weight means more fiber per square yard, which holds the pile upright under foot traffic and resists the matting that shade and dampness accelerate.
- Higher density means less backing is visible between fibers, which keeps the surface looking full even when the turf is slightly compressed.
- Lower pile height with higher density is the combination that drains fastest while still rolling true.
Backing Construction: What to Look For
The backing is where mold usually starts, because it stays wet longest. Look for:
- Permeable backing with a documented percolation rate, not just a "drainage holes" claim. Water should pass through the backing, not around it.
- Anti-microbial treatment built into the backing or applied as a factory finish. This is the single most under-specified feature in shaded installs, and it is the one that decides whether you are treating mold or preventing it.
- UV resistance so color holds in filtered light, which is less intense but still degrades untreated fiber over years.
- Dimensionally stable backing that will not wrinkle when it stays damp for extended periods.
Matching Turf Spec to Your Shade Level
Not every shaded yard needs the same turf, four hours of morning sun behaves differently from dappled light all day.
- Heavy shade (under 2 hours of direct sun): shortest pile in the range, highest density you can source, anti-microbial backing treated as mandatory, and plan on a more aggressive aeration and brushing schedule.
- Moderate shade (2 to 4 hours): mid-range pile height, high density, anti-microbial backing strongly recommended.
- Light shade (4 to 6 hours): standard putting green turf specs are usually fine, but keep pile height moderate and do not skip the permeable backing.
Step-by-Step Installation Process for a Shaded Backyard Putting Green
Installing putting greens in shady backyards follows a set order. Rush any step and the whole system pays for it later.
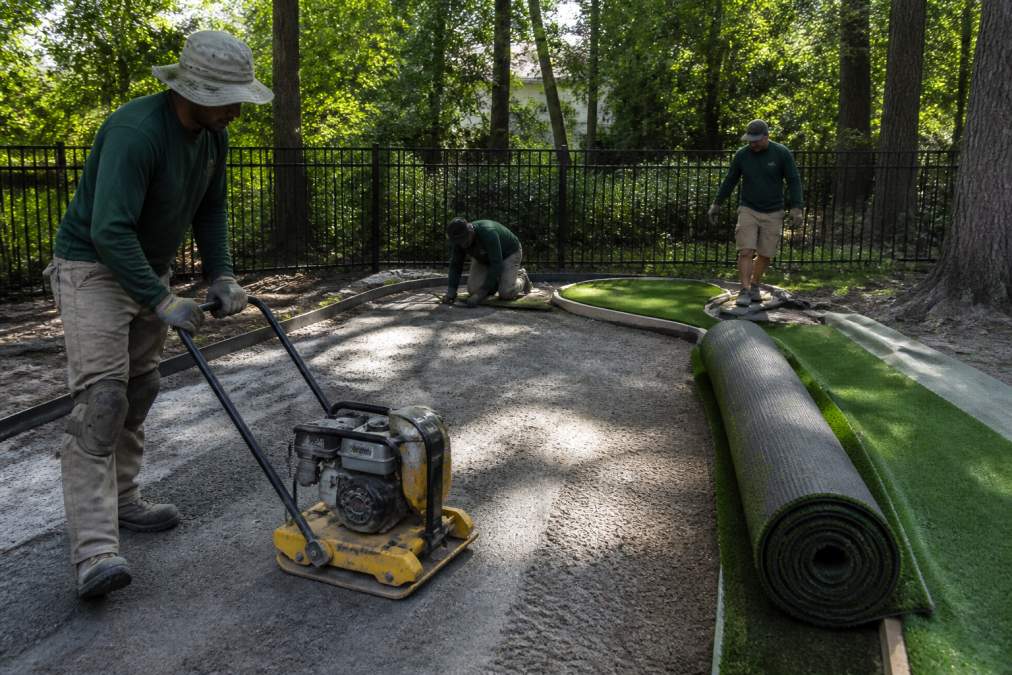
Step 1: Excavation and Leveling
Mark the green's shape, then dig down 3 to 4 inches. Remove roots, rocks, and soft soil.
Step 2: Base Stabilization and Infill
Lay geotextile fabric, then add crushed stone in lifts, compacting each with a plate compactor until the base is smooth and hard. Add infill to cushion the fibers and hold them upright.
Step 3: Seaming, Top-Dressing, and Finishing Touches
Roll out the turf and let it relax. Cut and seam the panels together with seaming tape and adhesive.
Expected result: A seamless, true-rolling putting surface.
| Step | What Happens | Watch For |
|---|---|---|
| Excavation and leveling | Dig 3-4 inches, grade for runoff | Low spots, leftover roots |
| Base stabilization | Fabric, crushed stone, compaction | Loose lifts, soft spots |
| Seaming and finishing | Seams, top-dressing, brushing | Visible seams, thin turf |
Backyard Putting Green Maintenance in Shade: Mold, Mildew, and Airflow
Backyard putting green maintenance in shade is mostly about airflow and moisture. Most guides treat mold as something you react to; in a shaded yard, it is something you schedule against. Mold and mildew thrive where air cannot move and water cannot drain, so break that cycle on a calendar, before you see black spots.
A Preventative Maintenance Schedule for Shaded Greens
A shaded green needs a rhythm. Exact intervals depend on your climate and canopy, but most practitioners in low-light yards schedule around wet and dry cycles rather than fixed dates.
- Weekly: Brush the turf to lift matted fibers and open airflow across the backing. Check the low spots and edges where water pools first.
- After every significant rain: Walk the green and look for standing water that has not drained within a few hours. Slow drainage is the earliest warning sign.
- Every 2 to 4 weeks in humid months: Inspect the backing and the base of the pile for discoloration, musty odor, or slick patches. These show up before visible mold.
- Monthly: Trim back hedges, low branches, and anything within a few feet of the green's edge that blocks airflow. Air movement is free drainage.
- Seasonally: Reapply infill where it has settled or shifted, and re-check the surface for dips that hold water.
- Annually: Have the sub-base inspected and, if needed, re-aerated. This is the step most homeowners skip and the one that most often precedes a failure.
Anti-Microbial Infill: The Step Most Guides Skip
Infill is not just ballast, in a shaded yard, the right infill is part of your mold strategy. Standard silica sand holds moisture on its surface and provides no biological resistance; in sun that is fine, but in shade it stays damp and becomes a substrate.
What to look for:
- Anti-microbial additive listed on the spec sheet, not just marketing language on the bag.
- Compatibility with your turf backing, some additives are formulated for specific backing types.
- Reapplication interval stated by the manufacturer, since anti-microbial treatments deplete over time and need refreshing.
- Drainage rate of the infill itself, because a fine infill that packs tight will slow percolation even if the backing is permeable.
Sub-Surface Aeration for Shaded Greens
Sub-surface aeration is the fix most installers never mention. It moves air and water through the base itself, not just the surface, and in a shaded yard it can be the difference between a green that lasts and one that fails. The crushed stone sub-base has void space between the aggregate; in sun that space dries from the top down, but in shade the top stays cool and damp, so the void space stays saturated with nowhere for water to go.
Cost of Professional Putting Green Installation: What Affects Your Quote
The cost of professional putting green installation depends on size, base depth, drainage work, and site access. There is no single flat rate, because no two shaded yards are the same.
The biggest cost drivers:
- Square footage of the green and fringe
- Excavation depth and how much soil moves
- Drainage work, including stone, fabric, and aeration
- Access, since tight gates slow the crew down
- Turf grade, from standard to premium dense pile
Common Mistakes to Avoid in Shady Backyard Installations
Most shaded green failures trace back to a short list of avoidable mistakes:
- Skipping the shade assessment. Guessing sun hours leads to the wrong turf and the wrong base.
- Using a shallow base. Thin stone holds water and settles fast.
- Ignoring airflow. Blocked air keeps the surface wet and invites mold.
- Choosing tall, plush turf. It mats, dries slowly, and hides the ball.
- Skipping sub-surface aeration. Trapped moisture has nowhere to go.
- No anti-microbial backing. Mold takes hold in the backing first.
- Forgetting the fringe grass. A real green needs a fringe for chip shots and clean edges.
Frequently Asked Questions
Does artificial turf grow mold in shaded areas?
Yes, mold and mildew can grow on artificial turf in shaded areas if moisture lingers. Shade reduces airflow and evaporation, creating damp conditions. To prevent this, ensure proper drainage with a crushed stone sub-base, use an anti-microbial infill, and avoid overwatering. Regular brushing and occasional rinsing help keep the surface dry. If you notice a musty odor or dark spots, address it promptly with a diluted vinegar solution or a turf-safe cleaner.
How do you prepare a shaded backyard for synthetic turf installation?
Start by assessing shade patterns and soil drainage. Remove existing grass and roots, then excavate to a depth of 3 to 4 inches. Install a geotextile fabric, followed by a compacted crushed stone base. Ensure the base slopes slightly for water runoff. For shaded areas, choose a turf with a shorter pile height and a permeable backing to improve airflow and drainage. Proper preparation prevents mold and extends turf life.
What is the best turf pile height for a shaded putting green?
For shaded putting greens, a pile height of 0.5 to 0.75 inches works best. Shorter pile reduces moisture retention and allows better airflow, which helps prevent mold. It also provides a truer ball roll. Pair this with a dense turf backing and an infill like silica sand or acrylic-coated sand to stabilize the surface. Avoid tall, plush turfs in shade as they trap moisture and can become matted.
How much does it cost to install a putting green in a shady backyard?
The cost of professional putting green installation depends on square footage, site access, base complexity, and turf quality. Shaded yards may require extra drainage work and mold-resistant materials, which can affect the quote. For an accurate estimate, contact a local installer like Bold Turf Co. They offer free estimates and 0% financing options to fit your budget.
A shaded backyard can still hold a great putting green. It just needs a build that respects water, air, and light. Bold Turf Co. designs and installs custom putting greens across the region with PFAS-free materials, drainage-first sub-bases, and 0% financing options. Our family-owned team stays involved from the first walkthrough to the final putt. Get started with Bold Turf Co. and request your free turf estimate today.